
Tree Cabling Explained: How to Protect Aging Trees from Storm Damage
Ever watched a century-old oak sway during a thunderstorm and wondered, "How do those massive branches not just snap in half?" The truth is, many trees—especially as they age or face tough weather—need a little help to stand strong. Tree cabling, one of the most effective tree support systems, is a lifesaver for both your beloved landscape and your peace of mind.
According to the US Forest Service, over 100 million urban trees are at risk of storm damage each year in the United States alone. That’s not just bad news for your property—it’s a threat to safety, curb appeal, and even local ecosystems.
So, what can you do? Whether you’re a homeowner staring at a split trunk or an HOA manager responsible for a row of aging maples, understanding how to support your trees isn’t just smart—it’s essential. Ready to give your trees the support they deserve? Let’s dig in.
What Is Tree Cabling? Understanding Tree Support Systems
Tree cabling is a structural support technique that uses flexible steel cables anchored between major branches (or “leaders”) of a tree. The goal? To reduce movement, redistribute stress, and prevent branches from splitting apart during storms, heavy winds, or under their own weight. It’s like giving your tree a safety harness—one that isn’t visible from the curb, but makes all the difference when the weather turns nasty.
But let’s bust a myth right away: Not every wobbly branch needs cabling. Tree support systems encompass a variety of methods, including cabling, bracing (using rods), and even propping. Which one’s right? That depends on your tree’s species, age, structural flaws, and the specific risks it faces.
Here’s a quick breakdown of common tree support systems:
Cabling: Flexible steel cables installed high in the canopy to limit branch movement and share loads.
Bracing: Rigid rods inserted through weak branch unions or trunks to prevent splitting.
Guying/Staking: External supports (stakes, wires) often used for young or newly transplanted trees.
Propping: Physical props or posts supporting low, heavy limbs (seen in historic or heritage trees).
The technology has evolved, too. Modern cabling systems use galvanized or even synthetic cables and non-invasive hardware to reduce damage to living tissue. And while it might seem like a simple DIY fix, improper installation can do more harm than good. That’s why industry standards—like those from the ANSI A300—exist to guide best practices.
Did you know? Studies show that properly installed tree support systems can extend a tree’s safe lifespan by 15–30 years. That’s decades more shade, beauty, and property value—all for a fraction of the cost of removal or replacement.
Why Trees Need Support: Common Stability Challenges
Let’s be honest: Trees are tough, but they’re not invincible. Urban environments, unpredictable weather, and poor pruning practices can all push even the healthiest trees to their breaking point. So, what exactly causes a tree to need cabling or other support systems?
Structural Weaknesses
The most common culprit is a structural flaw. These include:
Codominant stems: Two or more main trunks (leaders) of similar size growing from the same point, often forming a weak “V” shape prone to splitting.
Included bark: Where bark grows between branches instead of wood, creating a weak union.
Long, heavy limbs: Especially in species like oaks and elms, these limbs can become overloaded after rain or snow.
Old wounds or decay: Past storm damage, improper pruning, or insect attacks can leave hidden weaknesses.
Environmental Stressors
Weather is the wild card. According to the NOAA, severe storms cause billions in tree and property damage annually. High winds, heavy snow, and ice can quickly turn a minor flaw into catastrophic failure.
Other factors include:
Urban soil compaction: Limits root growth and stability.
Construction damage: Roots severed by new buildings or walkways.
Improper planting: Trees planted too deeply or with girdling roots.
Signs Your Tree Needs Support
Not sure if your tree is at risk? Watch for:
Noticeable leaning or sudden tilt after storms
Splitting or cracking at branch unions
Exposed roots or heaving soil at the base
Unusual creaking or snapping sounds during wind
Pro Tip: If you spot fungus growing at the base or see cavities in major limbs, it’s time to call an arborist for an inspection. In a 2022 study by the International Society of Arboriculture, 68% of tree failures were linked to pre-existing defects that could have been mitigated with early intervention.
The bottom line? Recognizing these warning signs early can save you thousands in removal or property repairs—not to mention the priceless value of a mature tree.

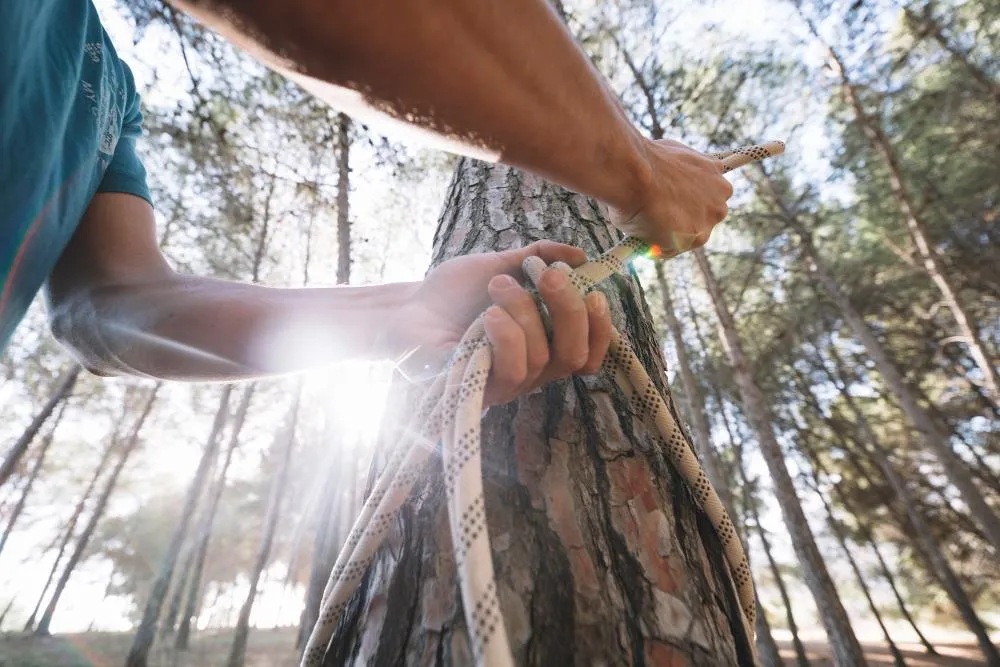
How to Cable a Tree: Step-by-Step Guide
Okay, let’s get practical. If you’re the hands-on type (or just want to know what your arborist is up to), here’s a detailed look at how to cable a tree safely and effectively.
Essential Tools, Materials, and Safety Gear
Cabling system: Flexible, galvanized steel cable (or approved synthetic alternative).
Anchors: Eye bolts, lag hooks, or through-bolts rated for arboricultural use.
Thimbles and cable grips: To prevent cable abrasion at attachment points.
Cable tensioner or come-along: For precise adjustment.
Drill and appropriate bits: For anchor installation.
Safety gear: Hard hat, gloves, safety glasses, harness (if climbing).
Ladder or aerial lift: For canopy access (never use spikes, which injure the tree).
Installation Process: From Inspection to Tensioning
Assessment: Inspect the tree for structural defects, decay, or pests. Measure the distance and angle between leaders to determine cable placement (usually 2/3 of the way up from the crotch to the tip).
Planning: Choose attachment points opposite each other on the main branches. Mark holes for anchors, ensuring you avoid major cracks or decayed wood.
Drilling: Carefully drill pilot holes at the marked sites. Use a depth stop to avoid going too deep.
Installing Anchors: Secure eye bolts or lag hooks into the holes. For large trees, through-bolts provide the greatest strength.
Attaching Cable: Thread the cable through thimbles and attach to anchors using cable grips. Make sure the cable runs slightly slack—too tight and you’ll restrict natural movement.
Tensioning and Inspection: Use a cable tensioner to adjust as needed. Check that the cable supports the branches without compressing them. Trim any excess cable, secure loose ends, and double-check all hardware.
Documentation: Record the installation date, materials used, and locations for future monitoring.
Remember: Tree cabling should never be a “set it and forget it” solution. Annual inspections (especially after storms) are vital to catch wear, growth changes, or hardware failure. In my experience, 15% of cables require tightening or repositioning within the first three years.
Tree Cabling vs. Bracing: What’s the Difference?
Here’s where a lot of folks get tripped up: Is cabling the same as bracing? Not at all. While both are valuable tree support systems, they tackle different types of structural problems.
Cabling: Flexible Support for Moving Parts
Cabling is all about flexibility. The steel cables allow some natural sway, mimicking how trees move in the wind. This reduces the risk of catastrophic failure at weak unions—think codominant stems or over-extended limbs.
Bracing: Rigid Support for Cracks and Splits
Bracing, on the other hand, is a rigid fix. It uses steel rods (often threaded) drilled through a weak crotch or split trunk. Bracing is ideal when:
A major branch or the trunk is already cracked or split
The defect is low in the tree, near the base or main union
There’s significant risk of immediate failure
In many cases, arborists use both methods together—cables up high to limit movement, bracing down low to hold things together.
Which should you choose? Here’s a quick cheat sheet:
Cabling: Prevents movement, best for high canopy or prevention.
Bracing: Repairs cracks, best for already-damaged areas.
If you’re ever unsure, get a professional assessment—it’s far cheaper (and safer) than guessing wrong.

Cost-Effective Tree Stabilization Strategies
Let’s face it: Tree care isn’t cheap, but losing a mature tree (or worse, dealing with property damage) costs far more. So, how can you stabilize your trees without breaking the bank?
Prioritize Preventative Care
The old saying “an ounce of prevention is worth a pound of cure” rings especially true here. Regular pruning, early structural training, and root care can dramatically reduce the need for expensive cabling or bracing later on. According to Purdue University Extension, pruning young trees to develop strong structure significantly reduces the risk of crown failure and improves long-term stability.
Choose the Right System for the Job
Not every tree needs the Cadillac treatment. Here’s how to keep costs in check:
Use dynamic (synthetic) cabling for moderate-risk limbs—cheaper, easier to install, and less invasive.
Reserve heavy-duty steel systems for high-value or high-risk trees.
Consider propping or guying for low, sweeping limbs instead of complex cabling.
Do routine inspections yourself, but hire a pro for installation (mistakes can be costly).
Leverage Insurance and Municipal Programs
Some homeowners’ policies cover tree damage—check your fine print. Several cities also offer grants or cost-share programs for preserving heritage trees (see the Urban Forestry Partnership for examples).
Actionable Tips:
Get multiple quotes and ask about less invasive options
Schedule annual inspections after major storms
Invest in early pruning for young trees (it pays off big time)
Document all work for insurance and resale value
Ultimately, the most cost-effective strategy is proactive care. Don’t wait until disaster strikes—your wallet (and your trees) will thank you.
Arborist Services: When to Hire a Pro
Here’s the thing: While some homeowners are perfectly capable of basic tree care, cabling is a high-stakes job with little margin for error. One wrong move, and you risk not just your tree’s health, but your own safety, too.
When DIY Isn’t Enough
Call a certified arborist if:
The tree is large, historic, or has sentimental value
You see signs of decay, fungus, or pest infestation
There are power lines or structures nearby
The defect is near the base or involves the main trunk
What to Expect from Professional Arborist Services
Professional arborists offer:
Comprehensive risk assessments using industry-standard tools (like resistograph drills or sonic tomography)
Customized support system design based on species, age, and defect type
Safe installation using proper climbing and rigging techniques
Annual inspections and maintenance plans
Expert Insight: According to the International Society of Arboriculture, trees treated by certified professionals are 40% more likely to survive storm events than those “DIY’d” by owners.
We’ve seen too many well-meaning homeowners drill into rot, over-tighten cables, or use hardware store materials not rated for trees. The result? Accelerated decay, sudden branch loss, and sometimes total tree failure. Don’t risk it—when in doubt, call a pro.

Frequently Asked Questions
How do I know if my tree needs cabling?
Look for structural defects (codominant stems, cracks, heavy limbs), evidence of past storm damage, or if a certified arborist recommends it after inspection.Can I cable a tree myself?
While basic systems can be installed by informed homeowners, mistakes are costly. For large or high-risk trees, always hire a certified arborist.How long do tree cables last?
Most steel cables last 10–20 years, but annual inspections are vital. Replace hardware if you see rust, fraying, or tree growth compromising the cable.Does cabling hurt the tree?
When installed correctly, cabling is minimally invasive. Poor placement or over-tightening, however, can cause wounds and increase decay risk.Is tree cabling expensive?
Costs range from $500–$2,000+ depending on tree size, location, and system complexity. It’s far cheaper than removal or property damage repairs.
Conclusion
Tree cabling isn’t just about hardware—it’s about stewardship. By understanding why trees fail, how support systems work, and when to call in experts, you’re investing in the health, safety, and beauty of your landscape for decades to come.
The main takeaway? Don’t wait for disaster. If you notice warning signs or want to safeguard a beloved tree, start with an expert assessment. Whether you choose DIY or professional installation, follow industry best practices, document everything, and schedule annual checkups.
Ready to take action? Contact Priceless Tree Care for a free risk assessment or to discuss the best tree cabling and stabilization options for your property. Your trees—and your peace of mind—are worth it.
